The strategy guide will teach you how to beat the A link to the Past Bosses. Each boss in A Link to the Past has their own strengths and weaknesses. Knowing which strategy to deploy against each boss will make fighting them much easier.
A Link to the Past Bosses
 Name: Armos Knight
Location: East Palace, Ganon’s Tower
Possible Weapons to Use: Sword, Arrows, Bombs
Strategy: This boss is easy. When you enter the room, go to your right so you’re in the bottom right corner. Wait for the Armos Knights to start bouncing around and start firing your arrows at them. Each knight should only take three arrows to kill. If you take to long to shoot at them, the knights line up at the top of the room and start to move down. When this happens, line up with the remaining knights and fire arrows at them. When you get down to the last knight, he will turn red and chase you around the room and attempt to stomp on you. Either shoot arrows at him or you can stand in place and keep using your sword. He won’t land on you if you keep using your sword.
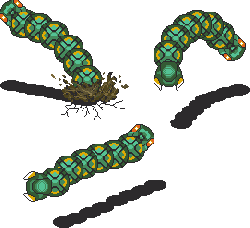
Name: Lanmolas
Location:Desert Palace, Ganon’s Tower
Possible Weapons To Use: Sword, Arrows, Bombs
Strategy: To start off, for the beginners, I suggest that you stay away from the boss for a few minutes just to get a feel for the bosses attacks and movements. When you feel ready, get near one of the Lanmola before it comes out. Make sure you’re not diagonal when you get near it. Now, you can do one of two choices. Place a bomb or start swinging your sword. My favorite is the sword because it’s sometimes hard to time the bombs. Slice at the head and move onto the next rising Lanmola….. Rinse and repeat. When you finally get down to the last Lanmolas, get next to it diagonally and start swinging your sword before it comes out of the ground. The reason why you must get diagonal is because he shoots dirt in all directions when he is the last one. When you slice your sword at him, it should push you back and you’ll evade the dirt without even having to move. Again, rinse and repeat.
 Name: Moldorm
Possible Weapons To Use: Sword
Location: Mountain Tower
Strategy: Prepare to face a really annoying boss. This boss will leave you pulling out your hair. Okay…… To start off, jump onto the platform and swing your sword at his tail. One swing should do it. Also, try to time your jump to where you get a free hit. After you hit him, back off of him and try to avoid him. The reason why I say that is because after every hit, he’ll speed up and his moves become extremely difficult to predict. After six hits, he’ll permanently be faster. Take your time with him at this point as there is no guaranteed way to get that last hit in.
Note: If you get knocked off, you will have to climb all the way back up and start over from the beginning. Good luck.
 Name: Helmasaur King
Possible Weapons To Use: Sword, Magical Hammer, Bombs, Arrows
Location: Palace of Darkness
Strategy: To defeat the Helmasaur King you must first destroy his iron mask. To do this place bombs near his face. You can also use the Magic Hammer. Repeat either tactic until the mask is completely gone. Once the mask is gone a green jewel will be visible on his face. Shoot it with arrows until the Helmasaur King dies. Alternatively, if you’re confident with your maneuverability, you can get up to his face and slice at him with the sword or continue using the bombs or Magical Hammer. Keep in mind that he will shoot a fire ball out of his mouth. This fire ball will multiply into two more fireballs and those fireballs will then shoot out diagonally. To avoid this, simply stand in the middle of the three fire balls.
 Name: Arrghus
Possible Weapons To Use: Sword, Hookshot
Location: Watergate Dungeon
Strategy: To defeat use your Hookshot to pull off the round orange enemies from Arrghus. Once they have been pulled off slash them with your Master Sword to kill it. Repeat this process until you have defeated all of the round orange enemies. Arrghus will then begin to jump around the room trying to land on you. Wait for the falling sound and then move to the right a little. Slash at him when he lands and he’ll jump back up. Repeat this process until he is dead.
 Name: Mothula
Possible Weapons To Use: Arrows, Sword, Fire Rod
Location: Skull Dungeon
Strategy: To defeat Mothula shoot him with your Fire Rod eight times. If you run out of Magical Power use your Master Sword. It isn’t as effective but will still get the job done. To add to the challenge the floor moves and spiked blocks cover the floor. I suggest getting the Magic Cape, and the Lv. 3 sword before facing this boss. If you do use the Magic Cape for this boss, use your sword. He’ll go down fairly easily.

Name: Blind the Thief
Possible Weapons To Use: Sword
Location: Thieves’ Town
Strategy: Blind is disguised as a maiden that you have to rescue. When exposed to light she will show her true form. Blind then begins to shoot fire at you. Avoid the fire and hit Blind’s head three times. His cloak will fall to the ground and his head will begin to chase you around the room while still shooting fire at you. Repeat the procedure and two heads will begin to chase you around the room. After that only three more hits of your sword will kill Blind.
 Name: Kholdstare
Possible Weapons To Use: Sword, Bombs, Arrows, Fire Rod, Cane of Byrna
Location: Ice Palace
Strategy: To defeat Kholdstare melt the ice he is surrounded in with your Fire Rod. Now repeatedly slash the three parts with your sword until all three parts are destroyed. To take away the threat being hit, use the Magic Cape.
 Name: Vitreous
Possible Weapon To Use: Sword, Bombs, Arrows, Fire Rod, Cane of Byrna
Location: Misery Mire
Strategy: To defeat Vitreous Use the Magic Cape right when you get into the room. Now simply walk up to the big eye and just start slashing your sword. When it comes out to use it’s lightning attack, you wont be harmed and you’ll also get some hit’s in on the main body. Remember, don’t worry about the little eyes. When you’re running low on magic, simply walk to the bottom right or left corner and use a magic potion. If you don’t have those, stay in the corner and just slash your sword continuously. After all the small eyes are dead, Vitreous starts to jump at you. just stay still and keep slashing. He’ll die soon after like 5-7 hits with the sword.
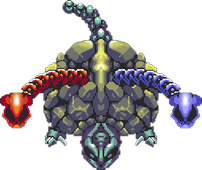 Name: Trinexx
Possible Weapon To Use: Fire Rod, Ice Rod, Sword
Location: Turtle Rock
Strategy: Trinexx’s red head shoots fire and his blue head shoots ice and freezes the ground. Start this battle by using the Fire Rod on the blue head. Now quickly run up to it and hit the blue head with your sword three times.After the blue head is dead, take out the Ice Rod and use it on the red head. When it’s stunned, run up to it and hit it three times. Once both heads have been taken care of, Trinexx will begin sliding around like a snake. Slash the flashing part of the body three times to finish the boss off for good.
 Name: Agahnim
Possible Weapons To Use: Net, Sword
Location: Hyrule Castle, Ganon’s Tower
Strategy: The first time you fight Agahnim he is by himself and he will occasionally go to the top-center part of the room to use an electricity attack. To defeat him, bounce back the energy balls that he shoots at you. Watch out for the spinning blue energy. When it hits anything, it’ll burst into different directions. The second time you fight Agahnim, he will have two fake copies of himself helping him out. The real one is much darker and not as transparent. Defeat him the same way you did the first time.
Note: If you access the map while Agahnim is moving around as a shadow, it’ll glitch his colors. This has no relevance with the fight and it will not harm your game in any way.
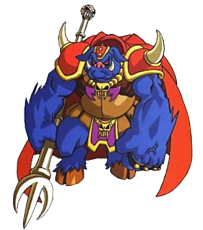 Name: Ganon
Possible Weapons To Use: Sword, Light Arrows, Cane of Byrna
Location: Pyramid of Power
Strategy: Start the fight out by having the Magic Cape ready to be used at any moment. Hit Ganon about 6 times and when he starts to make fire appear around his staff, use the Magic Cape. Continue to hit him and he’ll start to move around a lot and then jump up. When he lands, the floor around the edges start to fall. He’ll jump a total of four times during this process. After the floor surrounding the room is gone, Ganon will blow out the torches and stat to shoot fire at you from across the room. Get your fire rod out and light both torches again. If you’re running out of magic, use a potion. After lighting the torches hit Ganon and then get your Light Arrows out. Shoot Ganon once and then get your Fire Rod back out. The torches should be out again. Light them and then shoot Ganon with the Arrows again. Repeat this a couple more times and Ganon will die. Also, during that process, watch out for Ganon’s fire. He’ll try to shoot fire at you to knock you out of the room. If this happens, you’ll have to start the whole fight over again.
