
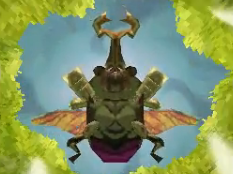
Stagnox
Description: Stagnox is the boss of the Forest Temple. This giant beetle looks quite scary.
Attacks: If you are too slow on your attack, Stagnox will try to ram into you. In part two of the fight he will shoot exploding enemies down towards you and then dive at you.
How to Defeat: During the part of the fight in which he is on the ground, you will need to avoid his charge attack and run behind him. Once you can see the purple haze surrounding his behind, you will need to use the Whirlwind on it which will stun him and enable you to slash him with your sword.
Do this a few times and he will eventually take off into the air. After he drops the exploding monsters at you, you will need to smack them with your sword which will turn them into a little bomb. Target onto one of them and wait for Stagnox to come diving at you. When he gets close, you will need to use the Whirlwind to send the bomb flying into his face. This will once again stun him so you can smack him with your sword. Repeat this until he is defeated.
Frazz
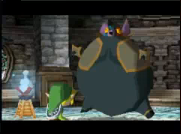
Description: Fraaz is kind of hard to describe. I guess I would say he is a gremlin-like bat monster that specializes in elemental attacks.
Attacks: He will fire Red-hot flames at you are Icy-cold flames at you.
How to Defeat: At the start of this battle, Fraaz will engulf himself in the hot flame and swell in size. When he does so, you will need to use your Boomerang and target the Icy flame and have it fly at Fraaz. This will make him shrink back down to his regular size and make him exposed to attacks via your sword. He will then engulf himself with Icy flames and again increase in size. Repeat the last strategy but this time target the Hot fire and hit him with that.
At this point he will split into 2 beings. One being a fake Fraaz and one being his real copy. You will have to target one of the copies of Fraaz with your boomerang and hit him to find out what element the other one is. From here it is pretty much like the same strategy as earlier. Use fire on ice and ice on fire. He will eventually re-merge with himself and smash the two torches in the room. Again the strategy will remain the same, except you will be targeting the ice and fire covered floor that is created when he misses his attacks, instead of the torches. Repeat and rinse.
Phytops
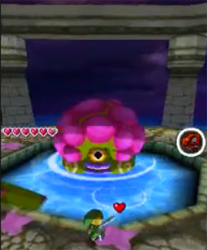
Description: Phytops is a giant tentacle monster…sounds very familiar
Attacks: As you are climbing your way up the mountain to him he will shoot slime at you. During the actual fight segment he will shoot a pink substance at you and swing his tentacles down at you.
How to Defeat: You will have to climb your way to the top of this mountain. So use your Whip and work your way right and up around the mountain. On your way you will have to avoid his attacks and use your Whip to sling thorns into Phytops eye. When you finally reach the top of the mountain the fight begins.
To defeat this nasty bugger you will need to first expose his weak spot, which in an amazing turn of events is no other than, his eye. To do this however, you will need to send two spores into his face with the thorns. Once doing so, his face will become visible and you can then shoot a thorn into his eye which will then stun and damage him. While stunned, he will fall down, either to the left or right, which will allow you to slash at him with your sword.
After he recovers from his beating he will dive underwater and start swinging his tentacles at you. So avoid his attacks and wait for him to emerge again. The strategy will remain the same from here on out except he will become faster and start spinning. So just chase after and stay in focus of his face. Repeat the strategies until he is defeated.
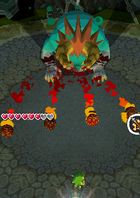
Cragma
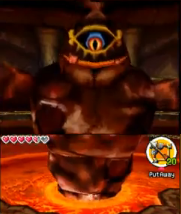
Description: Cragma is a gigantic giant made of rock and magma.
Attacks: Throughout the fight Cragma will try to slam his fists on you. When he slams both of his fists to the ground it will also cause a boulder to fall from the ceiling. He will also cause a rain of fire to fall down upon to you.
How to Defeat: Cragma will expose his glowing weak spot when he raises his fists to smash down onto you. As soon as he does this you will need to quickly target this spot on his belly and shoot it with an arrow. Striking him with the arrow will enrage Cragma and cause him to try to slam you with both of his fists. This will then cause a boulder to fall from the ceiling which you must avoid.
From here you will need to get Cragma to smash the boulder which will create a platform of which you can pick up and throw. You will need to carry the platform over to one of the small volcanoes and throw it on top of them. Once doing so you then need to jump over to the cart. It will go around the rails throughout the room and you will have to perfect your aim and hit him ins his various weakspots. Hitting him in his vulnerable locations will enable you to go further up the tracks and eventually reach his head. At this time you will need to hit him in his eye with an arrow. Once doing so he will become stunned and you will need to jump off the cart and to the ground where you can slash him with your sword. Repeat this process until Cragma is no more.
Byrne
Description: This ruthless warrior is Link’s final challenge to reach the top of the Tower of Spirits.
Attacks: Byrne does a variety of combat attacks. He will target you with his claw and lunge it at you. He is also very quick and can easily get in a few swipes. In phase two of this fight he will charge up his attack and do a diving attack.
How to Defeat: During the first stage of the fight Bryne will be jumping from pillar to pillar. Eventually he will target onto Link and lunge his claw at you with an attack. If you manage to successfully dodge his attack then he will get stuck in the ground for a few seconds which will give you a chance to have Zelda pull him down. Once he is held still you will be able to unleash some sword attacks upon him. He will eventually free himself and you will need to repeat this process until e begins his melee mode.
During this part of the fight you will need to use a variety of sword combos onto Byrne. If you manage to land a three hit combo then he will stumble and start to power up an attack. At this point you need to hide behind Zelda. He will charge at you but she will grab hold of him which will allow you to attack him with your sword again. After a few times he will get wise and begin to dodge your sword attacks a lot more so just be persistent.
Skeldritch

Description: Skeldritch is a giant skeletal demon of the Sand Temple.
Attacks: He will shoot rocks and lasers at you. Near the end of the fight his head will also chase you around the room.
How to Defeat: When Skeldritch shoots a rock at you then you will have to create a sand wall in its path which will make it stop in its path. You will then need to pick it up with your Sand Wand and place it onto a catapult so you can launch it at one of his many vertebrae. For the remaining vertebrae you will need to repeat this process but you will find that you must hit them from a certain angle. For the last vertebrae you will have to use a bomb om the switch to give the rock some extra firing range.
Once his head is all that remains, you will need to avoid his attacks and create a sand barrier around him. Once immobilizing him you need to get behind him and slash away with your sword until he is dead.
Demon Train
Description: The most laughable boss in Zelda history. A demon train.
Attacks: This demonic train will unleash a variety of arsenal based attacks upon you. In each of his different train cars are different kinds of attacks. Attacks range from exploding barrels to laser cannons. The Demon Train will also try to ram into you so be careful. We would not want you to take this boss serious or anything.
How to Defeat: The Demon Train boss fight consists of three different parts. The first of which is his back cart. Ride on next to the cart and it will open up so he can launch explosive barrels at your train. You will need to quickly shoot these barrels off before they are sent your way. Doing so will cause the Demon Train to scream and drive off.
You should now keep a good distance behind the Demon Train as he will try to slam on the brakes to slam into you. When he hits the brakes you should do the same. And when there is a part in the rails you should choose the path that does not have black demon bells ringing over them. From here you will need to try to get next to the Demon Train again for the second part of the fight.
This train cart will have laser shooting canons. They will make a distinct noise when charging their laser beam so use the sound as a signal of when to shoot at the canons.
For the final part of the fight you will need to drive up to his Demon Train Head cart. He will shoot several lasers at you which you must shoot to avoid. You will eventually end up in front of the train. To damage him just shoot your bombs at his face until he moves behind you.
Continue to avoid the Dark Rails and blast him in the face until he is defeated.
Malladus/Cole
Description: The second most laughable boss in Zelda history. Cole with his terrible pal Malladus, the demon king.
Attacks: Electric Mice, shifting floors, and a charged laser beam.
How to Defeat: This fight takes place on top of the recently defeated Demon Train. The goal of this fight is to work your way across the Demon Train to get Zelda’s body back from Malladus. As you work your way across the train Cole will constantly be sending tiny electrical mice out to bother Zelda.
If the mice happen to touch Zelda then it will shock her and deal damage to you if you are standing too close. This will also cause Cole to take control of Zelda. If this happens you must use your Boomerang to cut the strings at let Zelda go.
As you advance on the train the floor will begin to shift and Malladus will be shooting a laser beam at you. Timing is vital here as you must stay behind Zelda the entire time to avoid his attacks. When you finally reach the end of the train Cole and Malladus will float to the top of the screen. At this point you must charge up a Light Arrow to strike Malladus.
Malladus
Description: A three part fight with a real gigantic foe. The Demon King!
Attacks: He will shoot up to 4 fireballs at a time towards you and Zelda
How to Defeat: During part one of this fight you must protect Zelda from the fireballs that Malladus will shoot at her. To do this you must swipe your sword at them to deflect them away. When he shoots 4 fireballs at Zelda you must use a spin attack to deflect them in one hit.
Zelda will be charging up her power to hold Malladus down, but if she takes a hit the entire process will start over so be careful and protect her as well as possible.
During the next part of the fight you will actually be playing your flute. The song is not hard so just keep your cool and follow the beat. This will weaken Malladus so you can now fight him.
The fight is the third and final part of this fight. You will need to slash at him with your sword and distract him so he turns his back on Zelda. When this happens, press the Light Arrow icon on the DS and she will shoot one into his back. After he has taken 3 hits from the Light Arrows he will fall to the ground. This is when you must slash at his horns with your sword. One of his horns will eventually break. From here you just repeat the process until both horns have snapped off.
After this happens his Shining Gem on his face will now be exposed. Another Light Arrow and some slashes to that Gem and the final part will begin. Malladus will then start to clash with Link. A DS rub option will now pop up. You will need to use your stylus to quickly rub at that spot until Zelda joins in to help vanquish this foe once and for all.