
Eastern Palace: Yuga
This boss fight is pretty simple. All you need to do is shoot Yuga with an arrow to stun him, and then run up to him and get a few sword slashes in there. Once you do this, he’ll go into the wall, and move around the room’s perimeter a bit. He pauses before coming back out to attack, so you can line yourself up opposite him and nail him with an arrow as soon as he pops out. This fight is easy-peasy.
House of Gales: Margomill
This one is a tad bit harder, but nothing crazy. Zelda games are great about that slow ramp-up with difficulty. You need to use your Tornado Rod when Margomill is close to you so you can fly up and land on top of him, near that nasty eye of his. This stuns him, allowing you to take a few swipes at the eye. When he’s not taking any more damage, jump down. You’ll see that he gets a couple of layers added to his body, making him much too high to land on with the Tornado Rod. To alleviate this issue, take out your Bow. If you shoot at Margomill’s body three times, you’ll knock one of those layers away. Do this until he’s down to just the one metallic looking layer, and then use your Tornado Rod again. He’ll add even more layers – a total of four this time – but it’s the same process to whittle them away.
Tower of Hera: Moldorm
If you’ve ever played this game’s predecessor, A Link to the Past, this is literally the same fight. It’s a nice little throwback. To get to Moldorm, you’ll use the Hammer to pound down the laughing-faced switches that are above you. Stand on them to be bounced up a bit to the next platform. Repeat this process with the larger switches to reach the boss. Moldorm’s weak point is on his tail, which you’ll see as he stretches out. He just kind of moves around and does his own thing – he doesn’t ever really aim to attack you. The thing that can make this fight tricky is that when you hit Moldorm’s tail, you ricochet. And yes, you can fall off of the grating where you are fighting him. However, unlike A Link to the Past, you stay in the same chamber… this means that the damage the boss has taken doesn’t reset. If you do fall, there are hearts below should you need them. Just use the Hammer again to get back up. Moldorm becomes a progressively deeper shade of red as he takes damage, so you can gauge when he’s just about finished.
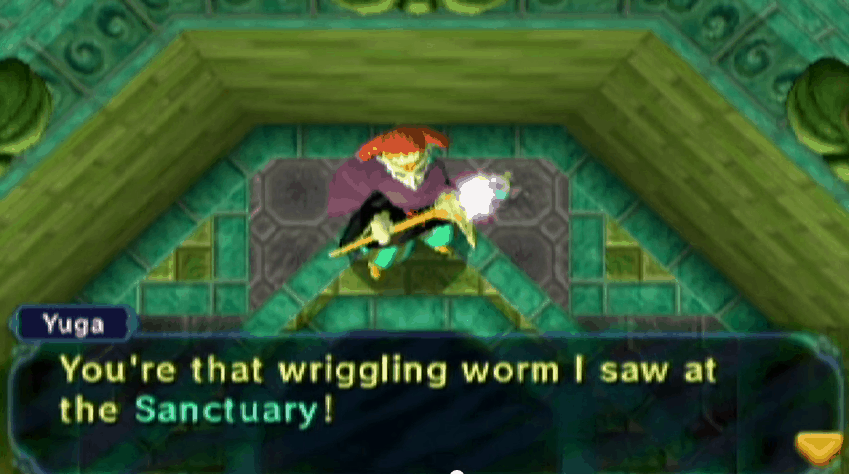
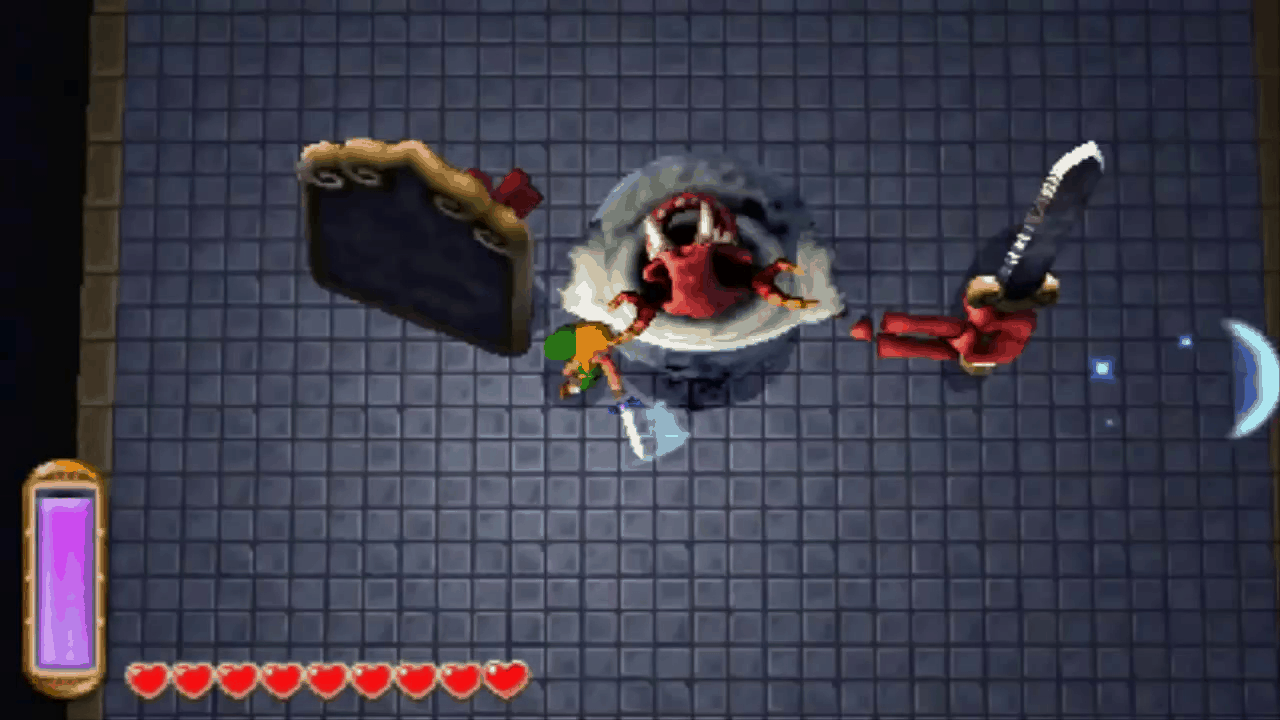
Hyrule Castle: Yuga
There are so many throwbacks in this game, I love it. This fight is similar to Agahnim from A Link to the Past. It’s also similar to the first time you fought him, it’s just a bit more complex. Yuga still goes into the wall. This time, you don’t need to worry about hitting him with an arrow. You’ll see when he goes into the wall that he’s created copies of himself. Three of this guy pops out of the wall, and they’re virtually identical. The way to tell the real one from the copies is to look at Yuga’s staff – the real one has energy emitting from the end of his staff, and the copies don’t. If you do hit a copy by mistake, it’s not a really big deal. The copy just turns into a soldier that you have to defeat. After doing this a few times, he’s retreating again… surprise, surprise.
Thieves Hideout: Stalbind
Stalbind begins the battle by becoming transparent and holding up his shield in front of him. If you run up to the shield, you’ll see that you can become a painting, the same way you would with a wall. Do this, and Stalbind will begin looking around like a doof, wondering where you went. Note that when he does this, he’s no longer transparent. Pop out of his shield and smack him one. After you’ve hit him a few times, he backs off and breaths dark energy at you. Just stand back, and if you have the beam upgrade for your sword going on (aka full health) you can hit him while he’s coming at you. If not, just hang tight for a moment. Next, he swings his sword at you. Dodge that, and when he puts his shield in front of him, hop in again. Lather rinse and repeat for a bit, up until his shield is gone. When he loses his shield, you want to wait until he does a huge spin attack. Dodge it, and once he’s done, he becomes dizzy and vulnerable. Hit him a bit more, and repeat this a couple of times, until his head flies off. His body is still swinging that sword while his head is spewing that dark energy again. At this point, you just need to hit his body a bit more to finish him off. His head will keep flying around and his body will keep swinging until you defeat him.
Desert Palace: Zaganaga
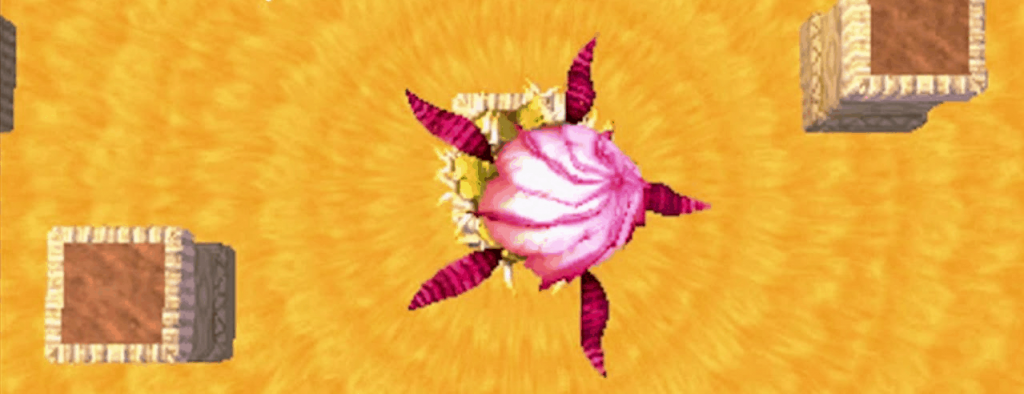
You’re going to need to use the Sand Rod to raise pillars of sand between these blocks – this is how you’re going to move around this room. Once Zaganaga emerges from the Sand, you just use the Sand Rod to raise a walkway right up to him, and slash at him as much as possible. The sand pillars do begin disappearing one by one after a certain amount of time – if you run into this, just hop onto one of the stone pillars. After taking enough damage, the flower on the end of Zaganaga will open up to reveal five eyes. He moves faster now, and will hurl Peahats at you as soon as he emerges. After the Peahats, he spits sand at you, which can knock you off these pillars… avoid that, no matter what. If you have full health, use the beams from your sword to hit this guy whenever possible.
Swamp Palace: Arrghus
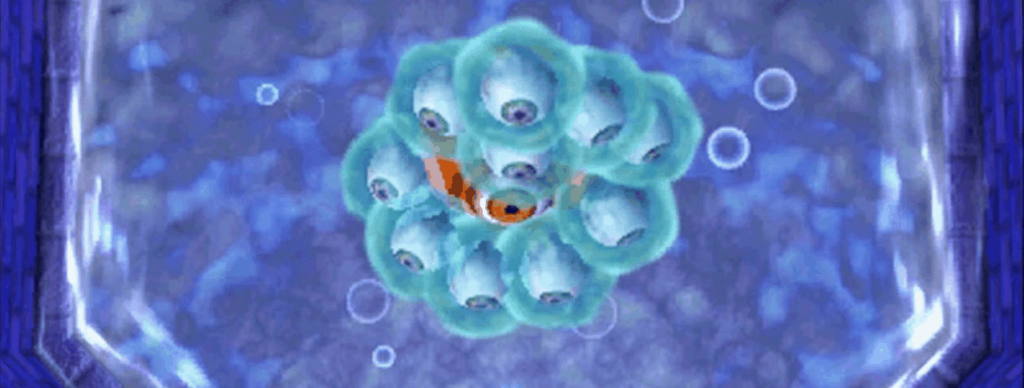
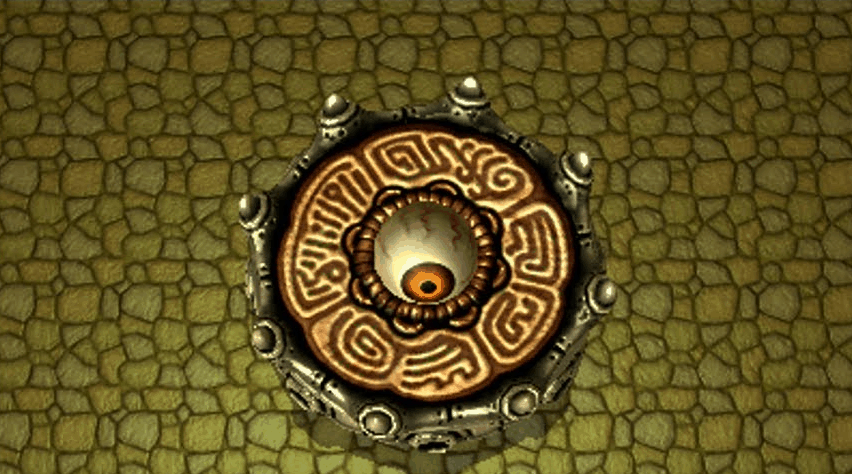
The first stage of this is simply clearing that wall of eyes that Arrghus uses as a shield. Use your Hookshot to grab an eye and pull it to you. It takes three hits to destroy each eye, and every so often, one of the eyes will fly at you. Just dodge it and resume what you were doing. These eyes do try to hop back to Arrghus if left alone for a minute, so just be aware that you may lose the one you were working on killing while dodging other things. After that is done, you’ll see Arrghus’s eye change. At this stage, he will begin leaping around the room. Hit him as you can. He also shoots a series of five beams from his eye that causes the water to erupt where they land, so just move out of the way. He moves pretty quickly, so you may only be able to get one or two hits in at a time.
Skull Woods: Knucklemaster
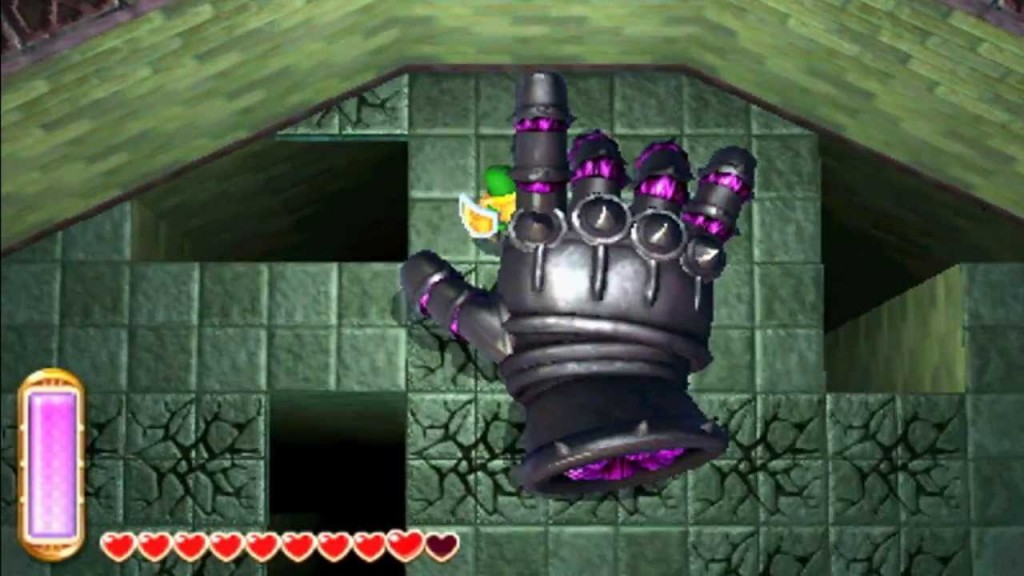
So Knucklemaster will ball his hand (body?) into a fist and will fly at you. What you need to do to avoid this is turn into a painting in the wall. He’ll hit the wall instead and will be stunned. Lay into him while he’s stunned of course. After doing this a couple of times, his eye will change color, and he will change tactics a bit. Instead of forming a fist and flying at you immediately, he moves upward and will slam into the floor a couple of times. Just go into the wall to dodge this too. After he does this two times, he will charge up to form a fist again. At this point, just repeat the process a few times to defeat him.
Turtle Rock: Grinexx

Grinexx is… a big volcano. For right now. He does exactly what you’d think a volcano would do – he spews fire death all over the place. The first stage of this fight involves using the Ice Rod to drop ice blocks in the mouth of the volcano that’s floating around under you. You actually don’t even need to aim for the mouth of the volcano, as long as you hit him. After taking a certain amount of damage, the grates will close up and Grinexx will come up to the same grate that you’re on… turns out he’s not a volcano. He will snap at you, so just avoid this and hit his head whenever you can. Every so often, he will go inside of his shell and spit fire at you on all sides, so just stay back to avoid this. He will also spin around the room in an attempt to hit you; to dodge this, just stay in a corner. After hitting his head enough, he will be defeated.
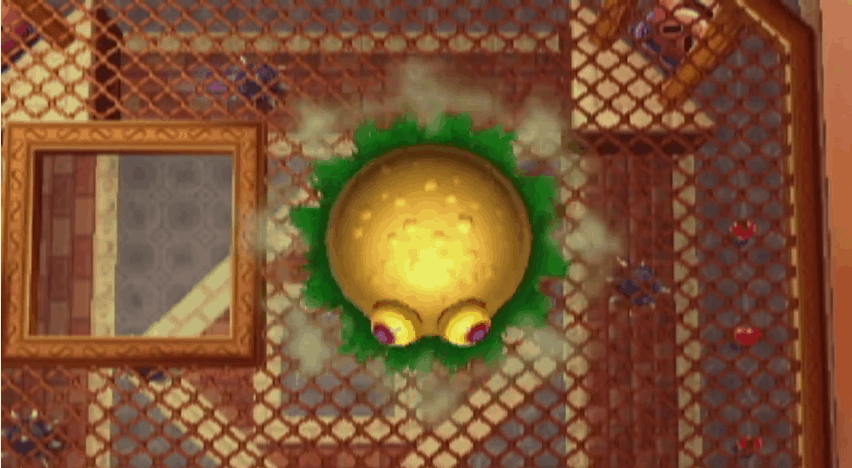
Dark Palace: Gemesaur King
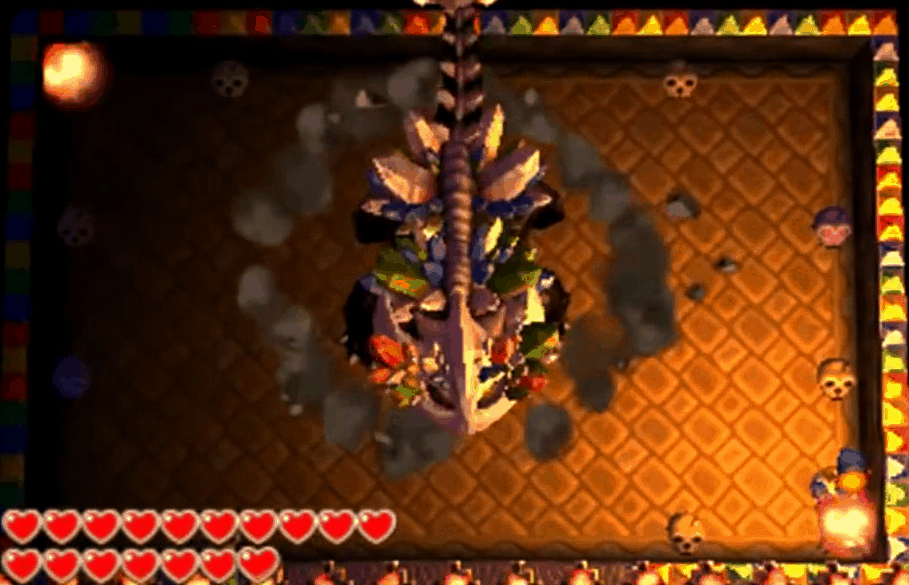
To see the boss and begin the fight, light the torches on the bottom-right and top-left corners of the room. When he drops down, you need to throw a bomb at his face. You’ll see that as you do this, the mask he’s wearing will crack. You also get rupees from this, so if you need some money, that is convenient. After a few bombs, the mask will break off. From here, you need to aim for the gem on his head. Hit him as much as you can… he will roar after a few moments and the room will go dark. When this happens, he begins charging around the room, so you have to be careful. You need to relight the torches; after you make it to one, you can go into the wall and go around the edge of the room to avoid getting hit on the way to the second one. After the room is lit up again, lay into the Gemesaur King and finish him off.
Ice Ruins: Dharkstare
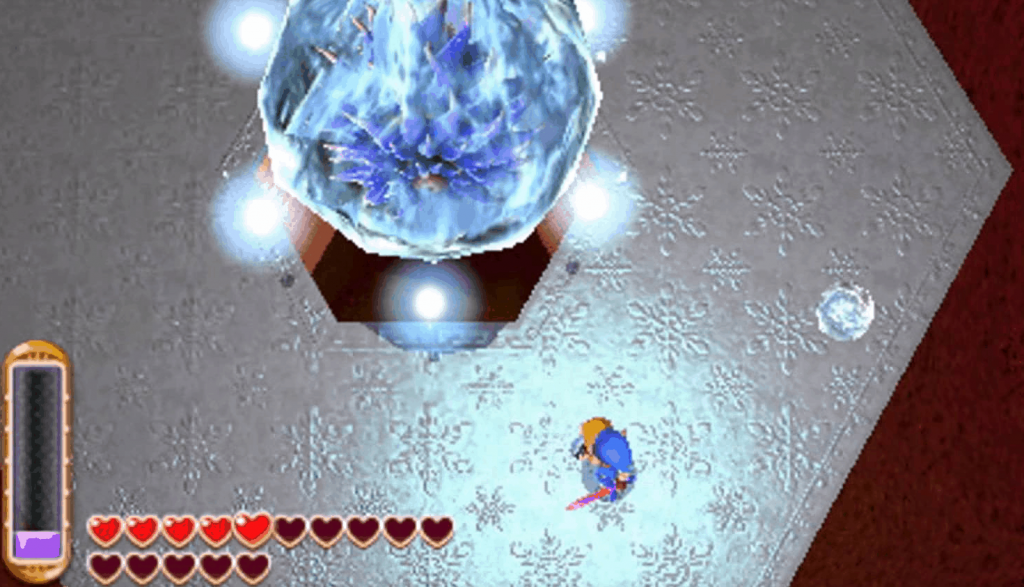
Dharkstore shoots beams from his body almost immediately. These beams stop at a certain point on the floor and then emit a cone or triangle shaped light that will harm you. The easiest way to dodge these is to use the Tornado Rod when they’re about to explode. After this, use you Fire Rod to hit Dharkstare to melt the ice off of him. He will then proceed to hop sadly around the room, at which point you can get a few hits in. That’s actually the whole fight – it’s not bad at all.
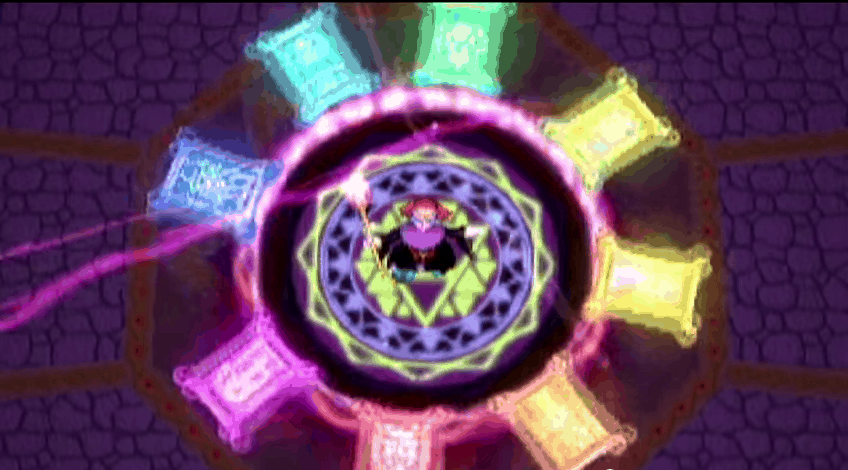
Lorule Castle: Yuga / Ganon
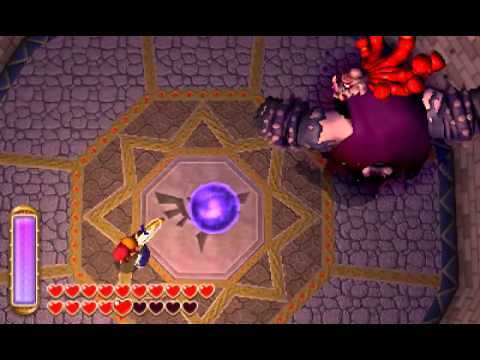
This time Yuga is merged with Ganon. He will lunge his trident forward, giving you a few moments to hit him a time or two. He’ll also swing it in front of him, giving you the same opening. He disappears and reappears, so just be aware of where he’s at. He will also disappear and pillars of dark energy will appear around the room – just run to avoid them. Yuga will also throw his trident and then disappear for a few moments, leaving the trident to chase you around the room. It’s nothing too bad, as Yuga will reappear after a couple of seconds. He will also charge up for a moment and then lunge forward. With all of these attacks, there are slight openings afterwards, where you can hit him as many times as possible.
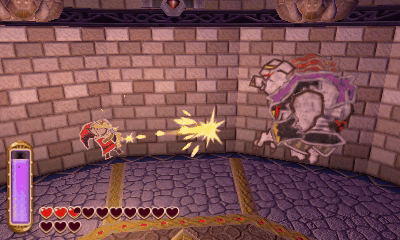
After the cutscene, there is a phase two! There are always multiple phases to final bosses. This next bit is a nice throwback to Ocarina of Time: it’s tennis. Yuga creates a ball of energy and hurls it at you; all you need to do is hurl it back. Once you hit him with the ball of energy, Yuga will turn into a painting himself for a moment. Princess Zelda bestows you with the Bow of Light. With the Bow of Light equipped, go into the wall in front of Yuga and hit him with a Light Arrow. While he’s busy fighting that arrow off, go around behind him and nail him with another one. Yuga will pop out of the wall, stunned. Lay into him for as long as you can. Once he disappears, he will start shooting energy every which way in the room. The best way to avoid this is to phase into the wall. After that is done, it’s the same process over again. When you go back into the wall, Yuga may charge at you. If he does, just pop out of the wall and in again behind him. From here, it’s just beating him down.